|
|
|
Image Maps Made Easy
HOME
| FREE
STORAGE | AWARD
SUBMITTER | TUTORIALS
| SEARCH
ENGINE SUBMITTER
FREE WEBMASTER DOWNLOADS
The new web designer frequently finds the coding for image maps somewhat daunting, as it is a little more complex than many of the other basic HTML functions and includes a lot of numbers and measurements. Granted, the Image Map is not the simplest concept of HTML. A well constructed ImageMap, however, can greatly improve the look and feel of your website. This tutorial will take you step by step through the process of creating an Image Map, and show you a shortcut or two, courtesy of today's software developers.
| If
you are interested in Internet consulting services for your business Click the link below to send us an e-mail request for more information. We are based in Chicago, Illinois, USA. |
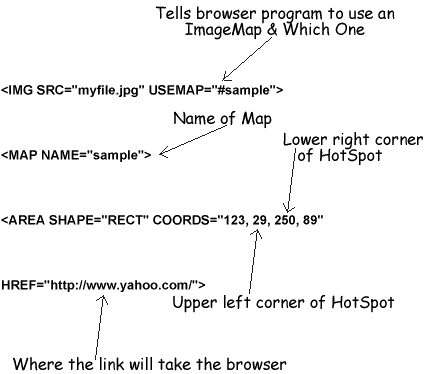
IMG SRC tag.IMG SRC tag, add the parameter
USEMAP="#". The value after the pound sign is the name
or your ImageMap, which you will assign to your ImageMap in the next step.MAP
NAME="". This appears in one bracket set and the name must
match the name you chose in you IMG SRC tag exactly. Spelling
Counts!AREA tag in which you
will begin to define the "HotSpots", the linking areas of your ImageMap.
First, in your AREA tag, tell the browser what SHAPE
your HotSpot is going to be. For this example, we will use a rectangle, or
RECT. (Other acceptable values include POLY, or
Polygon, and CIRCLE.) So far, the AREA tag looks
like:
AREA SHAPE="RECT" COORDS,
and is also a part of the AREA tag. Their are four coordinates
that the browser needs to have. The first coordinate is the distance in pixels
from the left side of the image, the second is the distance in pixels from
the top of the image, and will define the top left corner of the HotSpot.
The third coordinate is the distance in pixels from the left side of the image
and the fourth coordinate is the distance in pixels from the top of the image,
but these two define the lower right corner of the HotSpot. Each coordinate
must be seperated by a comma. Our AREA tag now looks like:AREA SHAPE="RECT" COORDS="xx,xx,xx,xx"

AREA tag as part of the COORDS attribute! Now, our
AREA tag looks like:AREA SHAPE="RECT" COORDS="123, 29, 250, 89"
HREF="http://www.somewebsite.com"
to the AREA tag. You may use the ALT attribute here,
instead of in the IMG SRC tag, to create custom Alternative Text
for each HotSpot. A complete AREA tag looks like:AREA SHAPE="RECT" COORDS="123, 29, 250, 89" HREF="http://www.yahoo.com/"
/MAP tag after you have defined
the last area of your ImageMap!The grapihc below, as fate would have it, uses an ImageMap,
where each tag appearing on the image is defined as a HotSpot that will link
you to the step in the tutorial where it is discussed. Try it and see, then
use VIEW|SOURCE to review the code. You will notice that
the MAP code itself appears at the end of the document. This
was done for organizational purposes, and is a recommended practice. You may
place your MAP code anywhere in the document after the
tag that calls it. The use of comment tags to set off ImageMaps, special banner
code (i.e:Banner Exchange Code, Affiliate Programs, etc.), or recurring elements
is also a good habit to develop.

I hope you have found this tutorial helpful. Feel free to explore the site further!
BACK TO HOME